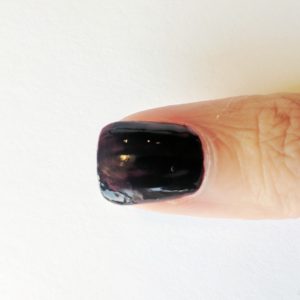
My DIY manicures usually last 5 days to a week (depending on the week’s activities). But once in a while they chip after only a few days. I apparently spent too much time in the pool yesterday, so I ended the day with a few chips in day 2 of my manicure. Instead of having to redo an entire manicure, just repair the chipped nail back to a day 1 look!

Disclosure: There are some affiliate links below and I may receive commissions for purchases made through links in this post. See affiliate disclaimer here.
WHAT YOU NEED: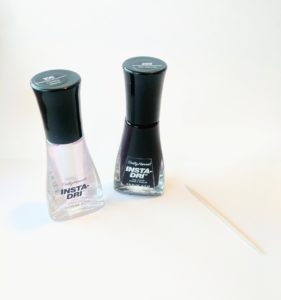
- Topcoat
- Your original nail polish
- Toothpick
Before you begin, always wash your hands before doing any work on your nails. You never know what dirt or oils your hands have collected throughout your day.
Prepare by rolling your original polish between your hands to mix it (why roll instead of shake?), I’m using Sally Hansen Insta-Dri in Go-Garnet(299). One of my favorite colors.
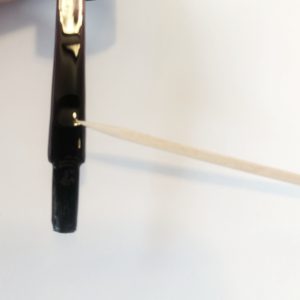
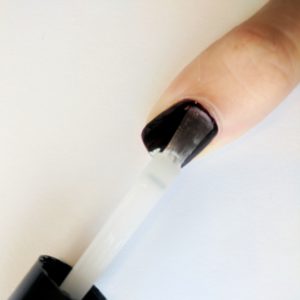
Let’s get started, open the polish and scrape a small amount off the stem of the brush. You can also scrape a little from the neck of the bottle, just avoid dipping your toothpick directly into the paint…you only need a very small amount of polish on your toothpick.
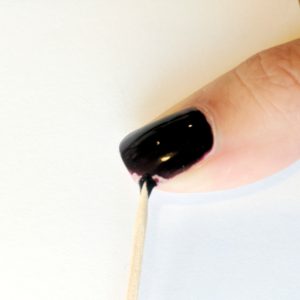 Next, very gently fill the chip in with your original color. If you have a large chip, like mine, you may need to replenish your toothpick with more polish a few times. Just take care not to apply too much at a time or it can get messy. Here we are going to break one of the golden rules of home manicures, instead of applying a thin layer of polish, you want to fill in the chip with a thick layer. Try to fill just up to the edge of the original manicure. Avoid applying your wet polish over the original so you don’t get a lump where the chip meets the original polish. If you do get some onto the dried portion, just carefully wipe it away with a q-tip or your finger.
After you’ve filled in the chip with a thick layer of the original color…let it dry. Insta-Dri dries in about 1 minute, but if I have the time, I usually try to let it dry for a few more minutes since it’s a thicker layer than usual.
Now examine your chipped area, does it match the original manicure? If you followed the golden rules of home manicures, you will have 2 to 3 thin layers of original polish. You want to make sure color and transparency of the patched area matches the rest of the nail. If you didn’t apply a thick enough coat to the filled in chip go ahead and apply another and let it dry.
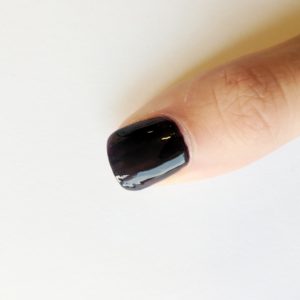
 At this point, you can see a difference between the repaired chip and the original manicure. That’s why you MUST apply a top coat. This evens out any grooves or slight unevenness in shine.
Apply an even layer of topcoat, I’m using Insta-Dri Clearly Quick(106), over all your nails, including the ones you didn’t touch up. On the repaired nails, apply a slightly thicker layer of topcoat than normal…this way it fills in any crevices or uneven layers between the original manicure and the filled in chip. Make sure you apply the topcoat all around the edge of your nail to seal in the new polish.
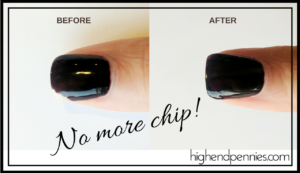
Now you’re all done! Your repaired nail should look as good as day 1 of your manicure. If you can still see an indent where the chip used to be in the sheen of you nail, apply another topcoat.
The key to a perfect blend is a thick enough top coat, but make sure you give it enough time to dry before you go about your day. I like to paint my nails first thing in the morning, that way they have at least an hour to set while I sip coffee with Jared.
Let me know how it works for you!